Search This Blog

Wednesday, December 24, 2014

Merry Christmas and Happy New Year

Another year has come and gone ... seems like the older I get, the faster the years fly by!

2014 was quite busy for my family ...

In March, my family went to visit a family friend in Arizona for her 80th birthday. We planned the visit through her sister so it would be a total surprise. The look on her face made all the "little white lies" her sister told well worth it!

In April, my daughter and I made a trip to Idaho to visit friends. We sure miss them!

In May, my daughter broke her foot and put a kabash on many of the end of the school year activities for her.

In June, my family traveled east to visit family. We were able to see our granddaughter - what a joy she is!

July brought a trip to Lake Tahoe where we were able to meet up with church friends and attend the Tahoe Family Encampment. We heard great lessons from great men. It was nice to get into the mountains and escape the heat.

August brought the beginning of school for Ana.

September brought another grandbaby! He is so sweet and I cannot get enough of him!


November - I felt like we were not home very much. We traveled to see our dear friend in Arizona and then out east to visit family for Thanksgiving.

We have been blessed to have been healthy this year (minus Ana's broken foot).

With the holidays upon us, I will be taking a break from my blog. So ....

Merry Christmas and Happy New Year!

Monday, December 22, 2014

Easel Calendar and Post-Its

I was cleaning my craft room and came across some extra 2015 calendars and Post-It notes and came up with these sweet calendars. My daughter is giving these to her teachers.


Have a great day!

Saturday, December 20, 2014

Gift Card and Candy Holder

I saw this while going through the many YouTube subscriptions I have. It was just the thing I needed for a gift card for Ana.


Have a great day!

Box with Crackers

I made this after Linda S. posted her cracker directions on a FB group to which I belong. It holds Lindor truffles.


Have a great day! :)

Friday, December 19, 2014

Snowman Goodie

I made this from a Lindt chocolate snowman. I used the scallop tag topper punch, embossing folder, and an oval framelit. 


Have a great day!

Wednesday, December 17, 2014

Frosty the Snowman

I wanted to take something to a friend who has asked us over for dinner. She is so crafty so I thought I'd make something for her.  

Frosty is what I made ...


I used The Crafty Owl's box builder page to give me the measurements I needed to make boxes with the Envelope Punch Board. The bottom box is 6"x3"x3". The next box is 5"x3"x3". The box for the head is 4"x3"x3". The hat box is 2"x3"x3". Goodies (peppermints, Lindor truffles, and Ghiradelli minis) are inside the three boxes that make up Frosty; nothing is in his hat.

I used buttons and dimensionals to help the back flaps stay in place.

The circle for the hat is the largest circle framelit. I cut a 1" strip of paper (not sure of its length) and embossed it before wrapping around the box. The flower is made with the Flower Shop stamp set and punch. The center is the flower stamp cut with the smallest center circle framelit to look like a button. All pieces of the flower were put together with dimensionals.

The Merry Christmas sentiment is from the Sassy Salutations stamp set.

I hope she likes it!

Have a great day!


Snowman Bookmark

I made this for my daughter ... she always seems to be in need of a bookmark! 

The snowman is on a wobbly effect thingy ... I cannot remember what those are called. :/


Have a great day!

Monday, December 15, 2014

Give Thanks

A couple of cards I made before Thanksgiving.


Friday, December 12, 2014

Chimney Card

I saw this idea on Pinterest and thought I would try making one. It turned out so cute!


Wednesday, December 10, 2014

Thank You Card

The inspiration for this card came from a card made by Sam (aka Pootles).


Monday, December 8, 2014

Frosty's Hat

I found the tutorial for this on YouTube. Isn't it cute!?!


Friday, December 5, 2014

Hippo Birdie to You Card

I love making these triple layer cards!


Wednesday, December 3, 2014

Enjoy the Little Things Bag

This bag is the same as my previous post (Bee Happy Bags) except the bag is decorated differently.


Monday, December 1, 2014

Bee Happy Bags

Another one of Sam Donald's bags ... It is so easy to make and it can hold all kinds of goodies!


Friday, November 28, 2014

Robin Punch Art Card

Here is a card I made from a Pinterest post along with the punches used to make this adorable bird.


Wednesday, November 26, 2014

Quilled Flower Bookmark

I received this idea in my email. It takes a little time, but I love the result!

Hope you have a great day! :)

Monday, November 24, 2014

Ribbon Holder

I made this ribbon holder after my cousin told me about The Frugal Crafter. Here is the link to her video.


Hope you have a great day! :)

Friday, November 21, 2014

EPB Matchbox Drawer

This box was made with the Envelope Punch Board. I CASE'd this from Dawn at Dawn's Stamping Thoughts.


Have a great day! :)

Wednesday, November 19, 2014

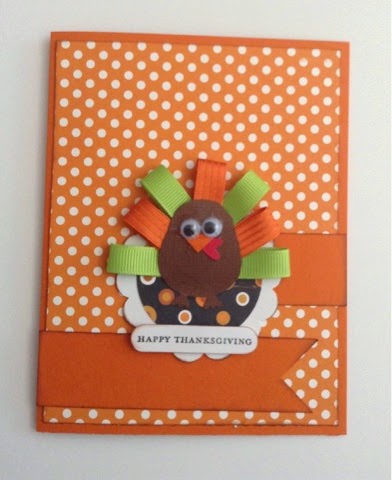
Thanksgiving Card

Thanksgiving already??? This year has flown by on me.

I made this card after seeing a post on Pinterest. Now to make a few more and get them in the mail before it is too late! 


Hope you have a great day! :)

Monday, November 17, 2014

Honey POP Birthday Card

I made this card for a sweet friend of my daughter. I actually snapped the pictures as we were putting it in the envelope to mail (thus the blurriness and cropped inside).

It is made with the HoneyPOP stamp set and honeycomb paper. I so enjoy these stamp sets. They are so fun to play with!


Hope you have a great day! :)

Friday, November 14, 2014

Rudolph Gift Card/Money Holder

Isn't this just the cutest!?!?  Did you know there are only 42 days until Christmas? 

.


Stampin' Up! products used in this project:

Blossom Petal Punch
Small Oval Punch
Oval Framelits
Word Window Punch
Petite Pairs Stamp Set
Chocolate Chip stamp pad

What You Need:

Brown CS 4 1/2" x 7" (card base) 
                 2 punches with the Blossom Petal Punch - the largest oval petal
                 1 punch with the Small Oval Punch for the tab on slider piece 

White CS 3" x 4 1/4" (for the base of the slider part) 
              3" x 1 1/2" (for the pocket piece)

Red CS for oval - I used the second oval framelit (from the center) 

2 - 20 mm eyes (that is if I measured them correctly)

Dark Brown CS 4 punches with the Word Window Punch

5" of red ribbon

Double sided tape

Adhesive (I used Tombow)

Glue

Hole punchers

Black thin line marker (I used a Sharpie)

Instructions:

Fold the 4 1/2" x 7" piece of CS in half. Close the bottom and side with double sided tape.

Use the small oval punch to punch a tab into the top center of the card holder.

Cut two of the dark brown pieces in half to create the antlers - use glue to hold the pieces together.

Adhere the ear pieces and antlers to the inside back of the card holder with adhesive.

Adhere the nose with adhesive to the front of the card holder.

Glue the wiggly eyes to the front of the card holder.

Draw a mouth onto the card holder.

Adhere the 3" x 1 1/2" white CS to the slider piece with double sided tape.

Adhere the brown small oval piece to the top of the slider piece. I slide this piece into the holder and matched the oval to the tab cutout on the card holder.

Punch a hole in the center for the oval and insert the ribbon. Trim ribbon ends if necessary.

Insert the slider piece into the card holder and Voila! It is now finished! 

Hope you have a great day! :)

p.s. This idea is not mine, but the measurements and instructions are. I believe I found this on Pinterest - all I have is a picture so I do not know who was the creator for this neat gift card/money holder.

Wednesday, November 12, 2014

Hershey Kiss Holder

Isn't this the cutest box!?!?


Sam made this in her Advent Countdown this year and I thought it was a great box to give someone who was having a birthday. If memory serves me correctly, she said it will hold 5 Hershey Kisses.  This box is currently empty because my family found my stash of Kisses! 

These would be fun to make as a family and have them hanging on the tree for Christmas. 

Hope you have a great day! :)

Monday, November 10, 2014

Tic Tac Cover

I have seen several of these made so I am not sure who to give credit too ... Angie and Sam's videos are the latest videos I watched.

Here is what I came up with ...


I did not take dimensions from either video as they did not work for the size Tic Tac box I purchased. 

These are really simple to make and are great for a last minute gift!

Have a great day! :)

Friday, November 7, 2014

Birthday Cards

By now, all of these cards have been given away so I can now post them!

These cards were made for family and friends with birthdays in October.


Hope you have a great day!

Thursday, November 6, 2014

Thanksgiving Turkey Card

I made this card after watching France Martin's video on YouTube.


Inside:


Hope you have a great day!


Wednesday, November 5, 2014

Spinner Top Box

Elaine from Papercraft Button shared this idea in September. 


These are so fun to make. I forsee many more boxes like this one in my future.

Have a great day!

Monday, November 3, 2014

Gift Card/Money Holder

My daughter needed a gift for a birthday party. She wanted to give the recipient a gift card so I made this.


This turned out much better than I expected and the recipient loved it!

Have a great day! :)

Friday, October 31, 2014

Halloween Decorations

I made these after seeing The Idea Room's post on Facebook on September 2, 2014.


I decided I liked them better on the island in my kitchen.


I added a few friends who have been with me for a few years!


Hope you have a great day! :)


Wednesday, October 29, 2014

Andes Treats

I was on a search to find a cute treat holder for Andes mints when I came across a picture of one.  I tracked down the original post here (http://simplysimplestamping.com/andes-mint-holders/). 

These are so cute and easy to make. It uses the Two Tag die from Stampin' Up, ribbon, cardstock, Label Love stamp set and matching punch, a perler bead, and glue dots.


Here are step by step pictures/comments on how this is made.

Add an additional score mark 1/4" from the score mark made by the die.

Cut a slit in the middle of the original score mark.

Thread the ribbon thru the slit at the top and then thru the slit you made.

Adhere the mints making sure one is on top of the ribbon.

Adhere the cardstock to the front. Thread the ribbon through the slit and then throughthe hole made by the die.

Thread the ribbon thru the perler bead and pull to tighten.

Attach the sentiment and you're done!